SegNet入门
文章目录
SegNet的实现建立在Caffe深度学习库之上。
设置caffe和数据集
- 下载SegNet源码。安装caffe
SegNet是通过监督学习来预测像素级类标签,因此,需要有相应的地面实况标签的输入图像数据集,标签图像必须是单通道,每个像素都标有其类别。本教程将使用CamVid数据集,其中包含道路场景367个训练集、233个测试集和101个验证集。该数据集在英国剑桥周围拍摄,包含白天和黄昏的场景。将使用图像大小为360x480的11类版本。
从这个GitHub库以SegNet所需的格式下载此数据以及本教程所需的其余文件。新建SegNet目录,下载的数据均放到此目录下。
1
2
3
4
5
6
7
8
9
10
11
12
13
14
15
/SegNet/
CamVid/
test/
testannot/
train/
trainannot/
test.txt
train.txt
Models/
# SegNet and SegNet-Basic model files for training and testing
Scripts/
compute_bn_statistics.py
test_segmentation_camvid.py
caffe-segnet/
# caffe implementation更新
CamVid/train.txt和CamVid/test.txt以便SegNet获取数据。SegNet需要一个以空格分隔的图片路径和相应的标注图片的路径(VS Code下Ctrl+F2即可批量替换)。1
/path/to/image1.png /another/path/to/label1.png /path/to/image2.png /path/label2.png ...
请在文本编辑器中打开这两个文件,然后使用查找和替换工具将”/ SegNet / …”更改为数据的绝对路径。
训练SegNet
下一步是建立训练模型,可以使用SegNet或SegNet basic训练。首先,打开模型文件 Models/segnet_train.prototxt 和推理模型文件 Models/segnet_inference.prototxt。需要修改所有模型的数据层中的数据输入源行。将此替换为数据文件的绝对目录。
根据GPU大小,需要在训练模型中修改批量大小。在12GB GPU(如NVIDIA K40或Titan X)上,能够分别使用批量大小为10或6的SegNet-Basic或SegNet。如果你有一个较小的GPU然后尝试使其尽可能大,但即使批量大小低至2或3仍应训练良好。其次,请打开求解器文件Models/segnet_solver.prototxt并更改两行; net和snapshot_prefix目录应该与数据的目录匹配。
对SegNet-Basic模型,推理模型和求解器原型文件重复上述步骤。创建一个文件夹来存储您的训练权重和求解器详细信息mkdir /SegNet/Models/Training.
现在准备训练SegNet!使用前先编译caffe-segnet。打开终端并发出以下命令:1
2
3./SegNet/caffe-segnet/build/tools/caffe train -gpu 0 -solver /SegNet/Models/segnet_solver.prototxt 2>&1|tee ./Log/segnet.log # This will begin training SegNet on GPU 0
./SegNet/caffe-segnet/build/tools/caffe train -gpu 0 -solver /SegNet/Models/segnet_basic_solver.prototxt # This will begin training SegNet-Basic on GPU 0
./SegNet/caffe-segnet/build/tools/caffe train -gpu 0 -solver /SegNet/Models/segnet_solver.prototxt -weights /SegNet/Models/VGG_ILSVRC_16_layers.caffemodel # This will begin training SegNet on GPU 0 with a pretrained encoder
第三个命令初始化来自在ImageNet上训练的VGG模型的编码器权重。如果您想尝试这个,可以在这里下载这些权重。
对于这个小数据集应该不会花太长时间,在大约50-100个迭代之后,将会收敛。训练精度应该大于90%,然后就可以开始测试。
2>&1|tee ./Log/segnet.log 此命令用于将训练过程中损失函数的变化记录在日志当中。
2是标准错误,&1是标准输出,2>&1意思就是将标准错误输出到标准输出中。文件描述符:0 stdin;1 stdout;2 stderr。tee的作用同时输出到控制台和文件。
测试SegNet
首先打开脚本Scripts/compute_bn_statistics.py 和 Scripts/test_segmentation_camvid.py 将第10行换成你的SegNet的Caffe安装地址。
SegNet中的批量标准化层根据训练期间每个小批量的均值和方差统计数据移动输入要素图。在测试时,我们必须使用整个数据集的统计信息。为此,请运行该脚本Scripts/compute_bn_statistics.py,确保将训练权重文件更改为你要使用的文件。1
2python /Segnet/Scripts/compute_bn_statistics.py /SegNet/Models/segnet_train.prototxt /SegNet/Models/Training/segnet_iter_10000.caffemodel /Segnet/Models/Inference/ # compute BN statistics for SegNet
python /Segnet/Scripts/compute_bn_statistics.py /SegNet/Models/segnet_basic_train.prototxt /SegNet/Models/Training/segnet_basic_iter_10000.caffemodel /Segnet/Models/Inference/ # compute BN statistics for SegNet-Basic
该脚本将最终测试权重保存在输出目录中,如/SegNet/Models/Inference/test_weights.caffemodel请将它们重命名为更具描述性的内容。
现在我们可以查看SegNet的输出了!test_segmentation_camvid.py将显示每个测试图像的输入图像,真实图像和分割预测图像。尝试这些命令,将权重文件更改为您刚刚处理的权重文件,并使用正确的推理统计信息:1
2python /SegNet/Scripts/test_segmentation_camvid.py --model /SegNet/Models/segnet_inference.prototxt --weights /SegNet/Models/Inference/test_weights.caffemodel --iter 233 # Test SegNet
python /SegNet/Scripts/test_segmentation_camvid.py --model /SegNet/Models/segnet_basic_inference.prototxt --weights /SegNet/Models/Inference/test_weights.caffemodel --iter 233 # Test SegNetBasic
结果
下表显示了我们使用SegNet在CamVid数据集上实现的性能。如果您已正确使用本教程,则应该能够获得前两个结果。最终结果是根据公开数据集中的3.5K额外标记图像进行训练,详情请参阅论文。 webdemo已接受过关于未公开的进一步数据和额外类别(道路标记)的训练。
| Model | Global Accuracy | Class Accuracy | Mean I/U |
|---|---|---|---|
| Segnet-Basic | 82.8% | 62.3% | 46.3% |
| SegNet (Pretrained Encoder) | 88.6% | 65.9% | 50.2% |
| SegNet (3.5K dataset) | 86.8% | 81.3% | 69.1% |

你也可以训练模型利用SegNet在线demo
将caffe-segnet-cudnn5目录下的tools/extra/下的parse_log.sh和extra_seconds.py以及plot_training_log.py.example复制到Log文件夹下,然后使用./plot_training_log.py.example 6 loss.png segnet.log命令生成训练过程中的Train loss vs. Iters曲线。

6代表曲线类型
Bayesian SegNet
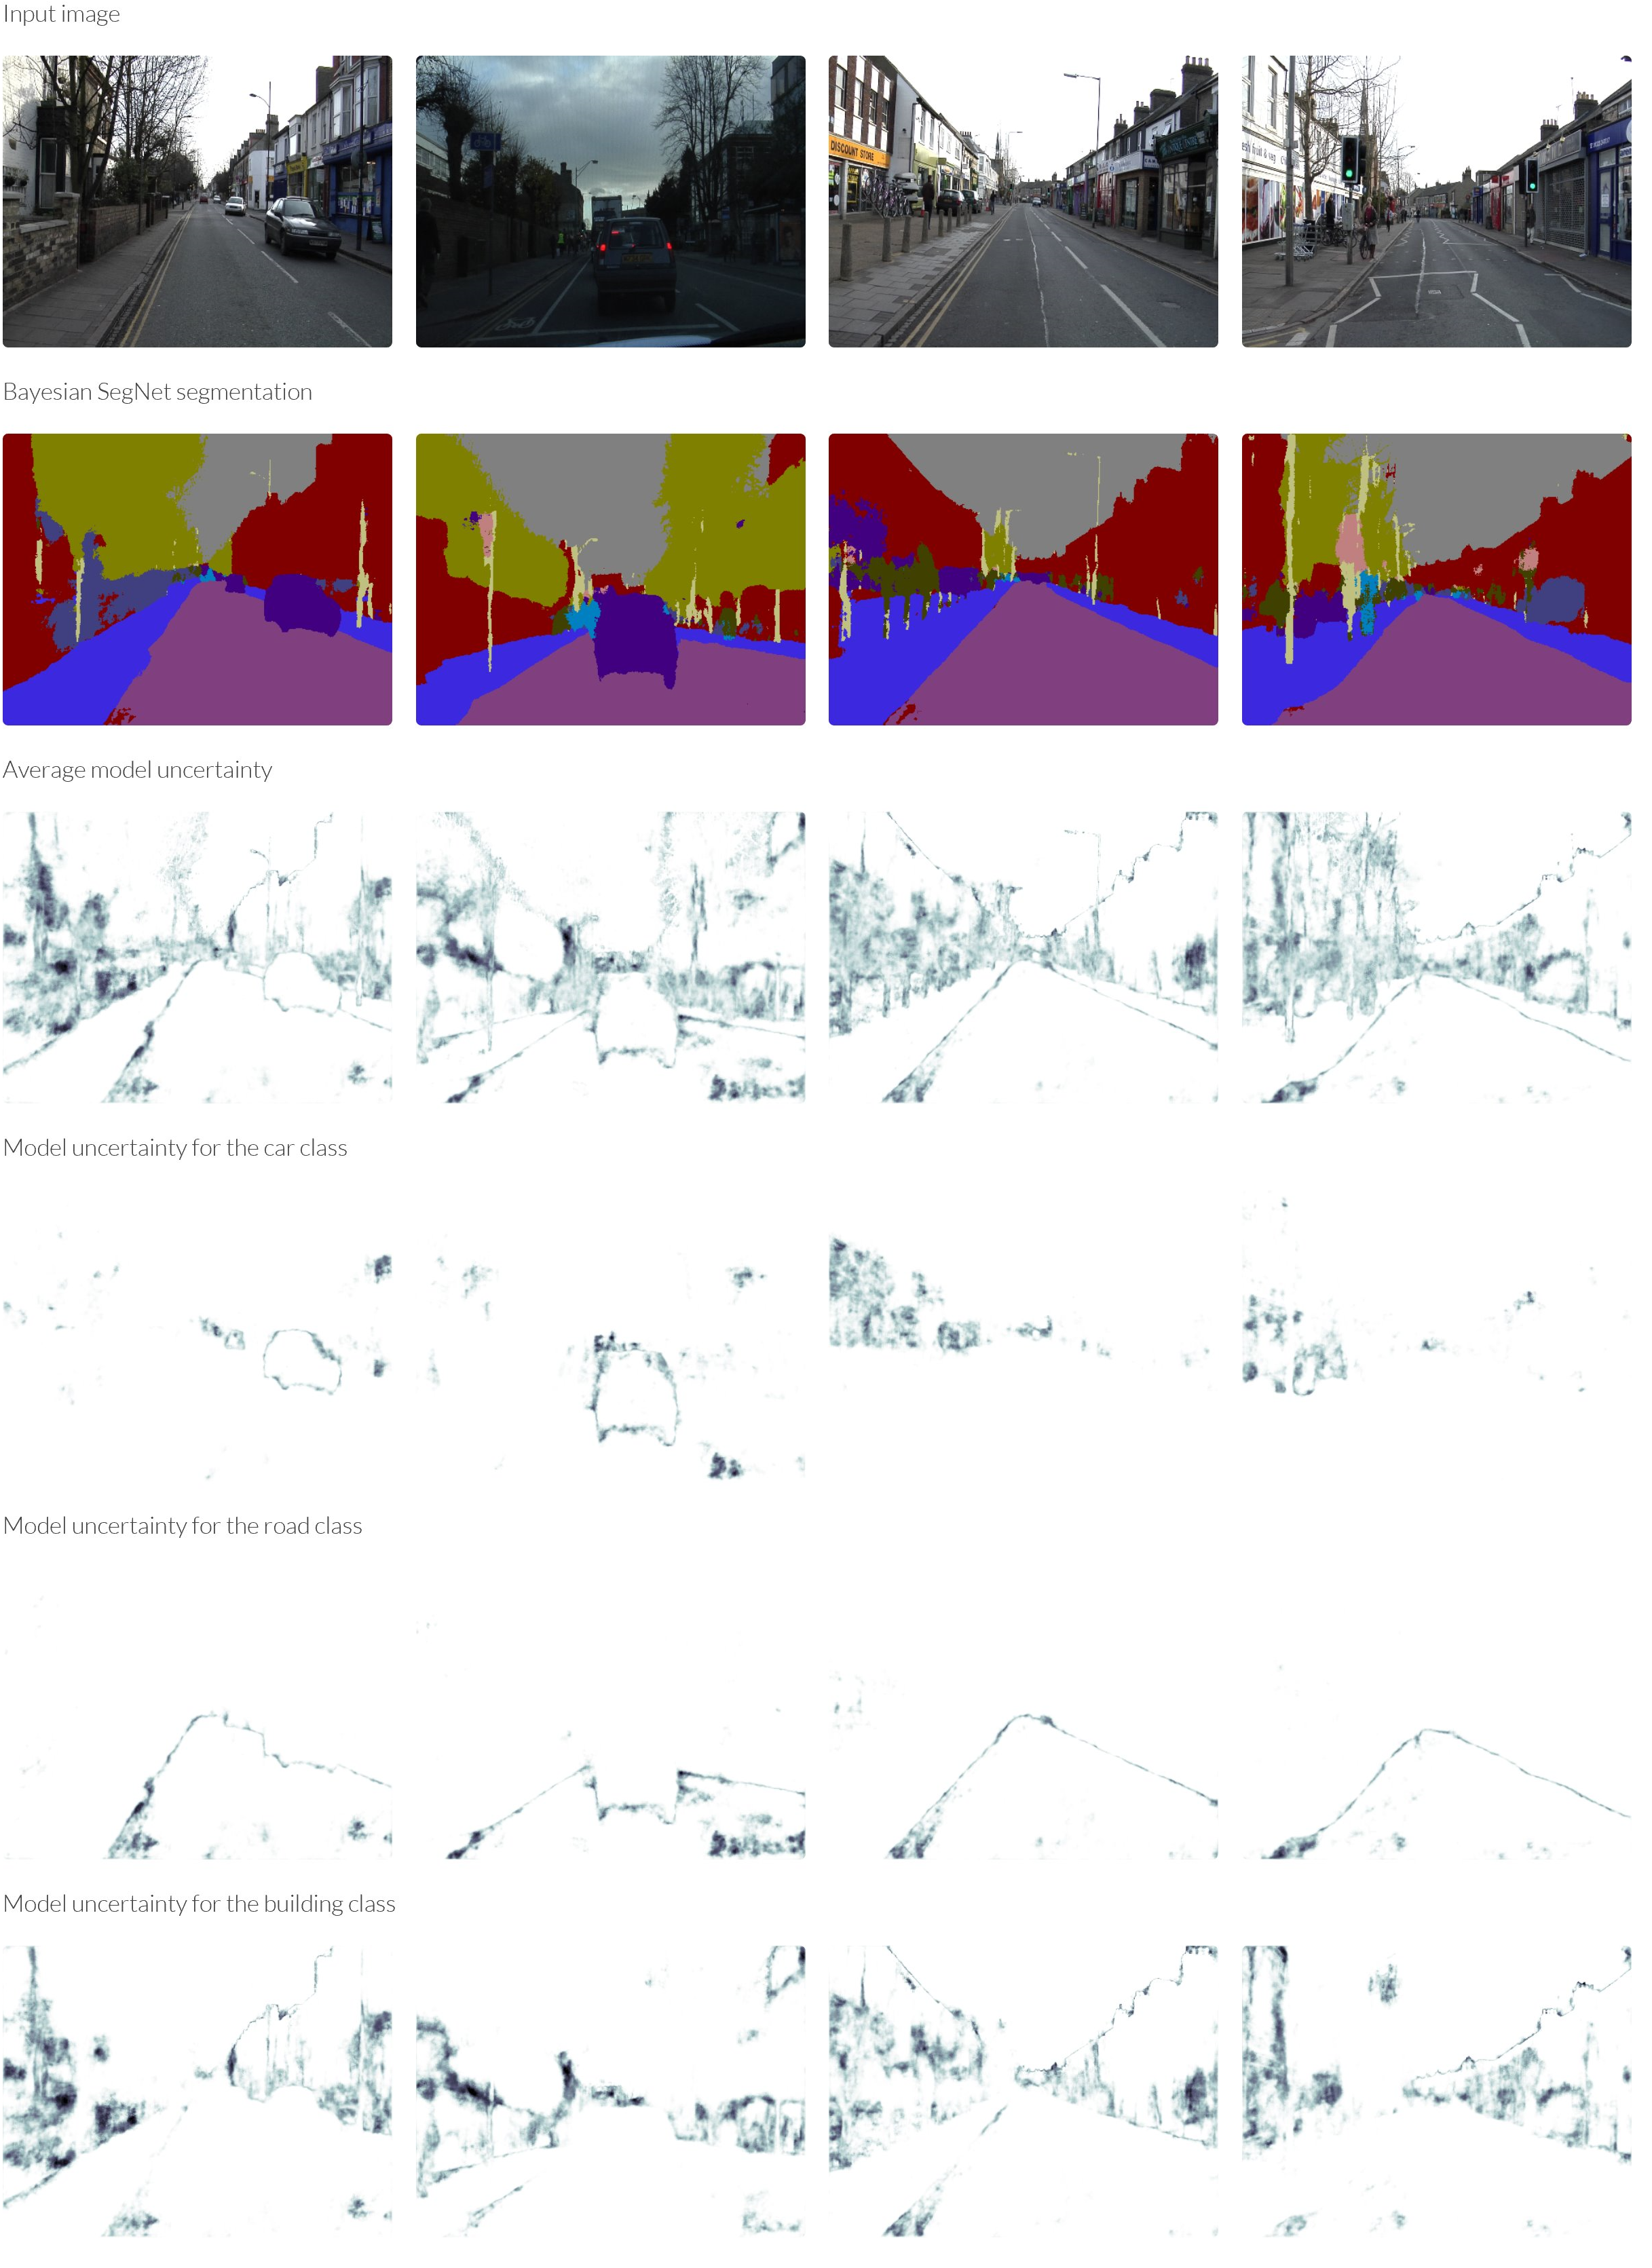
这是Bayesian SegNet的教程,是SegNet的概率扩展。在本教程结束时,您将能够训练一个模型,该模型可以以左侧的真实图像,并生成分割图像(中心)和模型不确定性的度量(右)。
模型不确定性可用于理解图像分割的可信度,并确定我们可以分配语义标签的特异程度。例如,我们可以说标签是卡车,还是简单的移动车辆?这可以对机器人的行为决策产生强烈影响。
该模型不确定性与从softmax分类器获得的“概率”显着不同。 softmax函数近似于类标签之间的相对概率,但不是模型不确定性的总体度量。有关更深入的解释,请查看Yarin的博客文章What My Deep Model Doesn’t Know…
训练
Bayesian SegNet模型在架构上是相同的,在最深的6个编码器和解码器单元之后引入了Dropout层。出来这次使用Models/bayesian_segnet_train.prototxt 和 Models/bayesian_segnet_solver.prototxt,其他和上面步骤一样。
该模型需要稍微长一点才能进行训练,因为Dropout的引入。然后可以如上所述从训练的模型计算批量标准化统计。请注意,在计算这些批量标准化统计信息时,dropout层使用权重平均技术。
测试
打开Scripts/test_bayesian_segnet.py 修改第14行,Caffe的安装目录。
Bayesian SegNet是一个随机模型,使用Monte Carlo dropout抽样来获得权重的不确定性,为了测试这一点,需要准备一个小批量样本,样本中每个图像都是相同图像。为此,请使用test_bayesian_segnet.py,它将显示每个测试图像的输入图像,真实图像,分割预测图像和模型不确定性。运行以下命令,使用正确的推理统计信息将权重文件更改为您刚刚处理的权重文件:1
2python /SegNet/Scripts/test_bayesian_segnet.py --model /SegNet/Models/bayesian_segnet_inference.prototxt --weights /SegNet/Models/Inference/test_weights.caffemodel --colours /SegNet/Scripts/camvid11.png --data /SegNet/CamVid/test.txt # Test Bayesian SegNet
python /SegNet/Scripts/test_bayesian_segnet.py --model /SegNet/Models/bayesian_segnet_basic_inference.prototxt --weights /SegNet/Models/Inference/test_weights.caffemodel --colours /SegNet/Scripts/camvid11.png --data /SegNet/CamVid/test.txt # Test Bayesian SegNet Basic
结果
以下是CamVid数据集的一些示例定性结果。也可以查看各个类的模型不确定性 - 这里显示了一些示例。
SegNet架构
该体系结构由一系列非线性处理层(编码器)和一组相应的解码器组成,后面跟着一个按像素分类器。通常,每个编码器由一个或多个具有批量归一化和ReLU非线性的卷积层组成,接着是非重叠的最大池化和子采样。由于池化过程引起的稀疏编码在解码器中使用编码序列中的maxpooling索引进行上采样(参见下图)。 SegNet的一个关键要素是在解码器中使用maxpooling索引来执行低分辨率特征映射的上采样。这具有在分割图像中保留高频细节并且还减少解码器中可训练参数的总数的优点。整个架构可以使用随机梯度下降进行端到端训练。即使没有基于CRF的后处理,原始SegNet预测也趋于平滑。
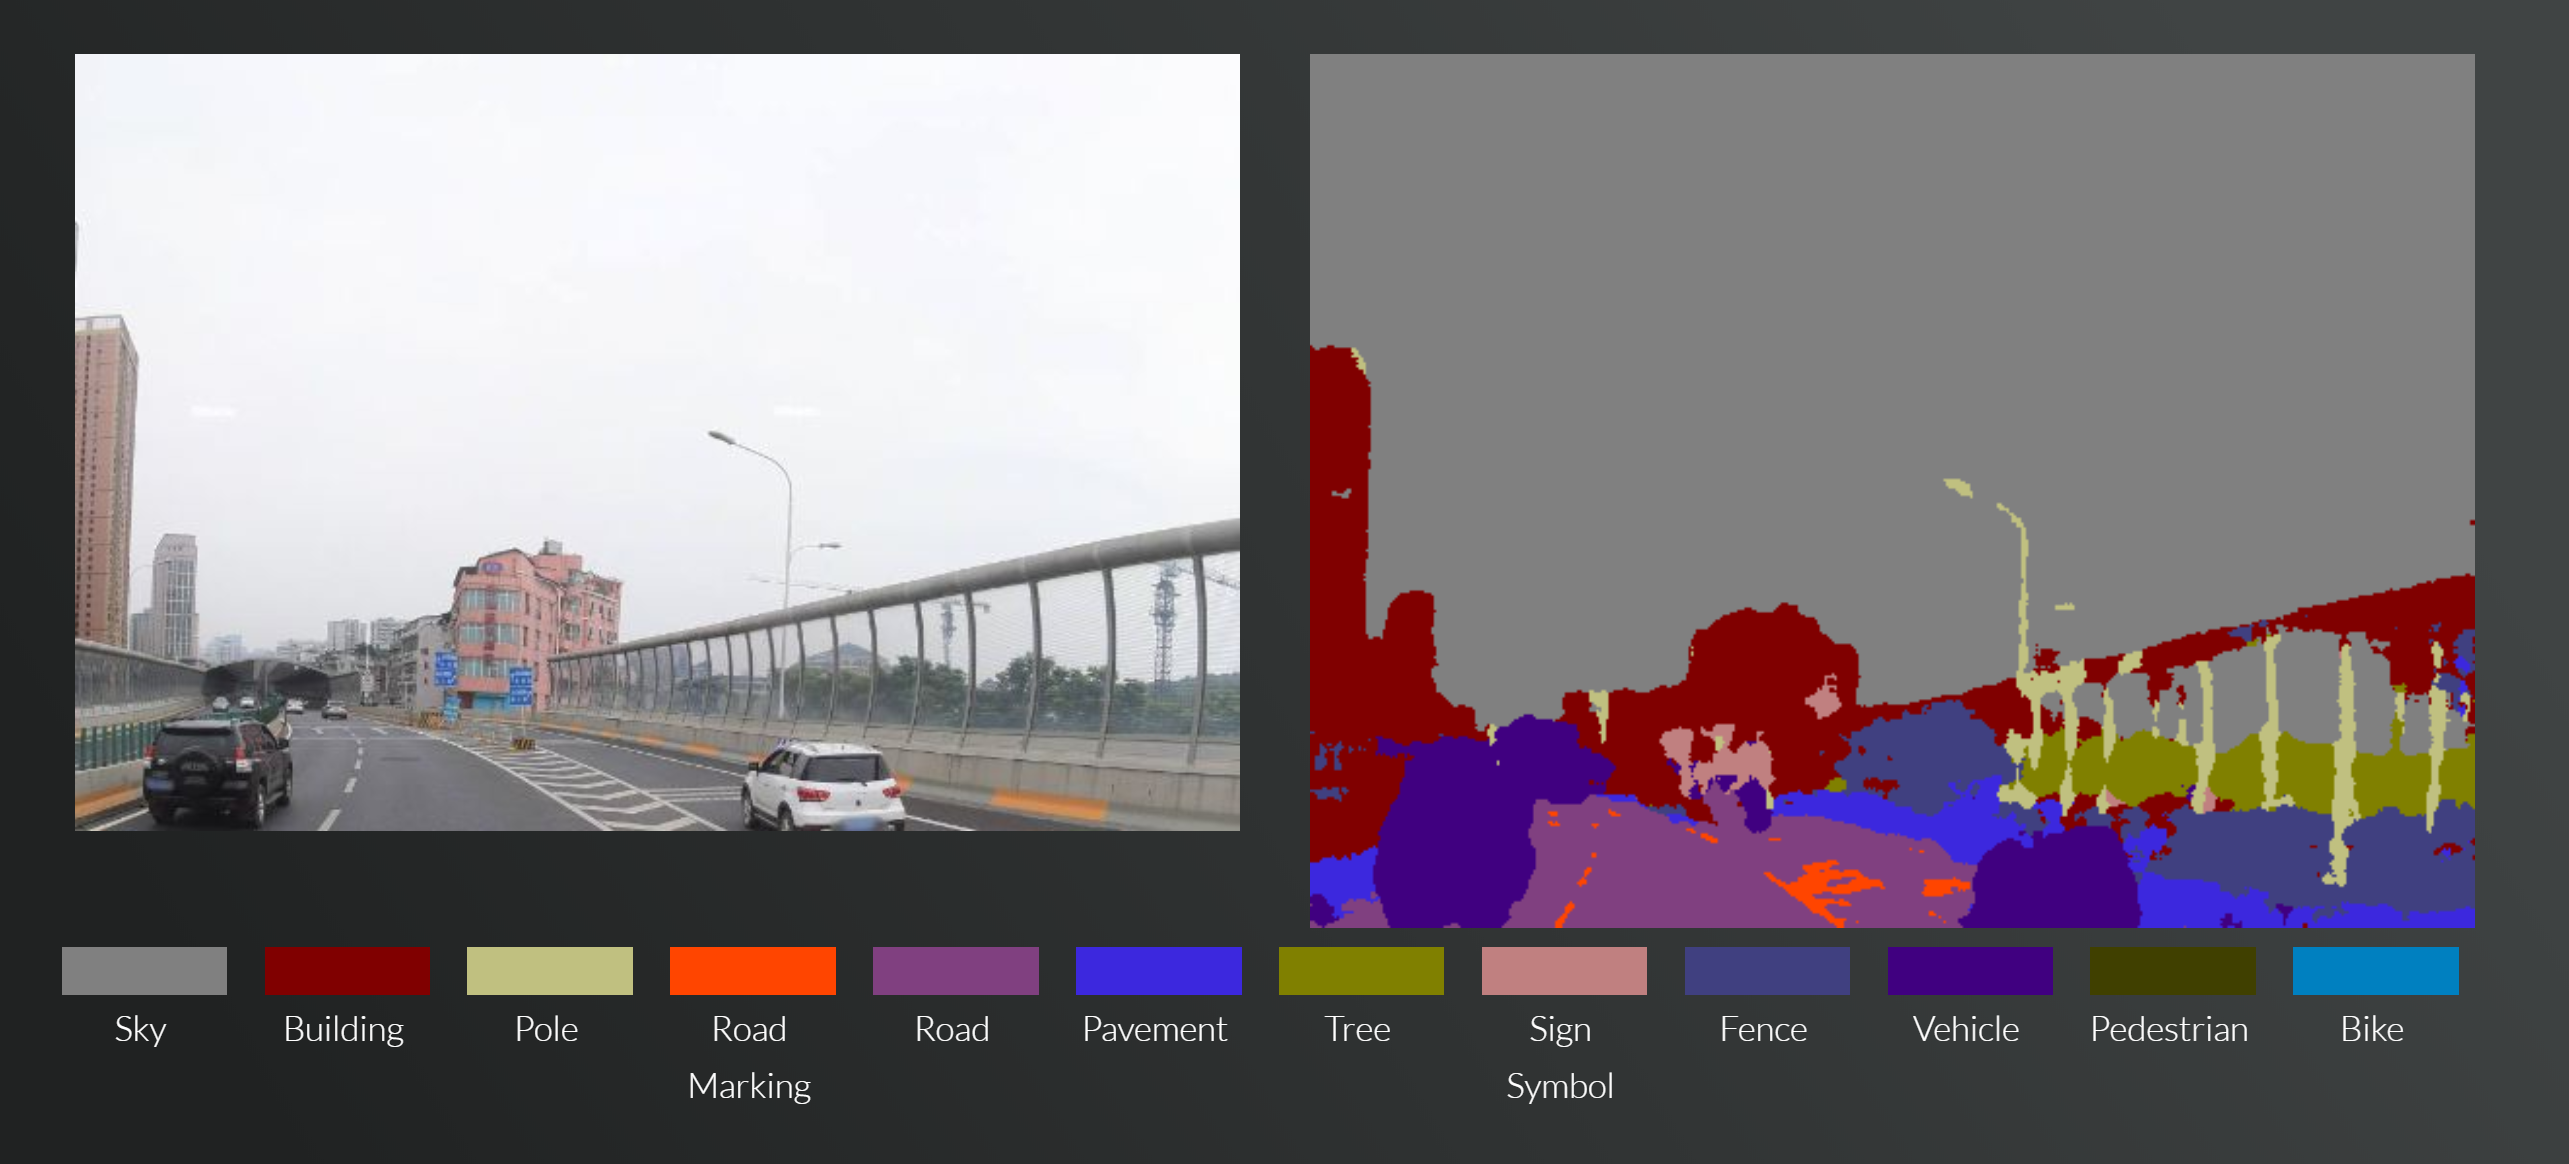
运行Webcam Demo
下载权重文件,修改代码14行中SegNet的目录,调用以下命令:1
2
3python Scripts/webcam_demo.py --model Example_Models/segnet_model_driving_webdemo.prototxt --weights Example_Models/segnet_weights_driving_webdemo.caffemodel --colours /Scripts/camvid12.png
替换为
python Scripts/webcam_demo.py --model Example_Models/segnet_model_driving_webdemo.prototxt --weights Example_Models/segnet_weights_driving_webdemo.caffemodel --colours Scripts/camvid12.png
注意将/Scripts/camvid12.png前面的/去掉,即Scripts/camvid12.png。否则会报以下错误:1
AttributeError: 'NoneType' object has no attribute 'astype'
具体可参考:https://www.pyimagesearch.com/2016/12/26/opencv-resolving-nonetype-errors/
SegNet模型库
所有的贝叶斯模型都可以作为SegNet模型进行测试,删除所有Dropout层上的sample_weights_test: true,并将batch_size设置为1.
Driving Web Demo
此模型用于SegNet webdemo,经过训练,可将道路场景分为12类。
模型文件:segnet_model_driving_webdemo.prototxt
权重文件下载:[http://mi.eng.cam.ac.uk/~agk34/resources/SegNet/segnet_weights_driving_webdemo.caffemodel]
CamVid
使用CamVid数据集训练这些模型。
- Segnet Basic model:segnet_basic_camvid.prototxt
- Bayesian Segnet model:bayesian_segnet_camvid.prototxt
- Bayesian Segnet Basic model:bayesian_segnet_basic_camvid.prototxt
SUN
使用SUN RGB-D训练这些模型以进行室内场景理解。
- Segnet model: segnet_sun.prototxt 权重: [http://mi.eng.cam.ac.uk/~agk34/resources/SegNet/segnet_sun.caffemodel]
- Bayesian Segnet model: bayesian_segnet_sun.prototxt 权重:[http://mi.eng.cam.ac.uk/~agk34/resources/SegNet/segnet_sun.caffemodel]
train_segnet_sun.prototxt为用于训练的模型定义文件
还训练了一个224x224的模型:
- SegNet低分辨率模型:segnet_sun_low_resolution.prototxt 权重:[http://mi.eng.cam.ac.uk/~agk34/resources/SegNet/segnet_sun_low_resolution.caffemodel]
Pascal VOC
使用Pascal VOC 2012数据集进行训练
- Segnet model:segnet_pascal.prototxt 权重:[http://mi.eng.cam.ac.uk/~agk34/resources/SegNet/segnet_pascal.caffemodel]
- Bayesian Segnet model:bayesian_segnet_pascal.prototxt 权重:[http://mi.eng.cam.ac.uk/~agk34/resources/SegNet/segnet_pascal.caffemodel]
该模型基于Dropout enc-dec变体,为224x224图片尺寸而设计。
CityScapes
使用CityScapes(11个类别)数据集微调了webdemo权重
- 11类的CityScapes模型(由Timo Sämann, Aschaffenburg University of Applied Sciences):segnet_model_driving_webdemo.prototxt 权重:[http://mi.eng.cam.ac.uk/~agk34/resources/SegNet/segnet_iter_30000_timo.caffemodel]
问题
- AttributeError: ‘NoneType’ object has no attribute ‘astype’
1
2
3python Scripts/webcam_demo.py --model Example_Models/segnet_model_driving_webdemo.prototxt --weights Example_Models/segnet_weights_driving_webdemo.caffemodel --colours /Scripts/camvid12.png
替换为
python Scripts/webcam_demo.py --model Example_Models/segnet_model_driving_webdemo.prototxt --weights Example_Models/segnet_weights_driving_webdemo.caffemodel --colours Scripts/camvid12.png
具体可参考:https://github.com/alexgkendall/SegNet-Tutorial/issues/87
- error: (-215) ssize.width > 0 && ssize.height > 0 in function cv::resize
图片路径问题
webcam_demo
1 | #!/usr/bin/env python |
参考文献
[1] Badrinarayanan, Vijay, Alex Kendall, and Roberto Cipolla. “SegNet: A Deep Convolutional Encoder-Decoder Architecture for Image Segmentation.” arXiv preprint arXiv:1511.00561 (2015).
[2] Brostow, Gabriel J., Julien Fauqueur, and Roberto Cipolla. “Semantic object classes in video: A high-definition ground truth database.” Pattern Recognition Letters 30.2 (2009): 88-97.
[3] Ioffe, Sergey, and Christian Szegedy. “Batch normalization: Accelerating deep network training by reducing internal covariate shift.” arXiv preprint arXiv:1502.03167 (2015).
[4] Kendall, Alex, Vijay Badrinarayanan, and Roberto Cipolla. “Bayesian SegNet: Model Uncertainty in Deep Convolutional Encoder-Decoder Architectures for Scene Understanding.” arXiv preprint arXiv:1511.02680 (2015).
[5] Gal, Yarin, and Zoubin Ghahramani. “Dropout as a Bayesian approximation: Representing model uncertainty in deep learning.” arXiv preprint arXiv:1506.02142 (2015).
原文地址:http://mi.eng.cam.ac.uk/projects/segnet/tutorial.html
参考:
https://github.com/alexgkendall/SegNet-Tutorial/issues/51