caffe-segnet 配置使用
安装
首先下载SegNet。查看libopencv-dev信息,若不存在则安装。1
2
3
4
5
6
7sudo apt-cache show libopencv-dev
sudo apt-get install libprotobuf-dev libleveldb-dev libsnappy-dev libopencv-dev libhdf5-serial-dev protobuf-compiler
sudo apt-get install --no-install-recommends libboost-all-dev
sudo apt-get install libgflags-dev
sudo apt-get install libgoogle-glog-dev
sudo apt-get install libatlas-base-dev
安装以下依赖库:
1 | # Python2版本命令如下 |
编译
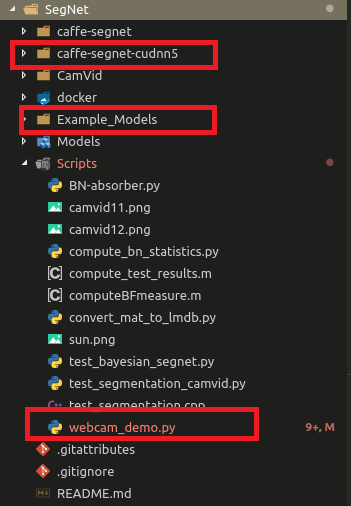
下载caffe-segnet-cudnn5,这个版本支持cudnn加速。将下载的文件放入到SegNet目录中,并进入caffe-segnet-cudnn5目录。目录结构如下图:
1
cp Makefile.config.example Makefile.config # 拷贝文件
修改Makefile.config,将WITH_PYTHON_LAYER:=1 前的注释去掉。将USE_CUDNN :=1前注释去掉以便使用cudnn加速。1
2
3
4
5
6
7
8
9
10
11
12
13
14
15
16
17
18
19# 如果你不使用GPU的话,就将
# CPU_ONLY := 1
修改成:
CPU_ONLY := 1
# 若使用cudnn,则将
# USE_CUDNN := 1
修改成:
USE_CUDNN := 1
# 若使用的opencv版本是3,则将
# 查看opencv的版本命令: pkg-config --modversion opencv
# OPENCV_VERSION := 3
修改为:
OPENCV_VERSION := 3
INCLUDE_DIRS := $(PYTHON_INCLUDE) /usr/local/include
LIBRARY_DIRS := $(PYTHON_LIB) /usr/local/lib /usr/lib
修改为:
INCLUDE_DIRS := $(PYTHON_INCLUDE) /usr/local/include /usr/include/hdf5/serial
LIBRARY_DIRS := $(PYTHON_LIB) /usr/local/lib /usr/lib /usr/lib/x86_64-linux-gnu /usr/lib/x86_64-linux-gnu/hdf5/serial
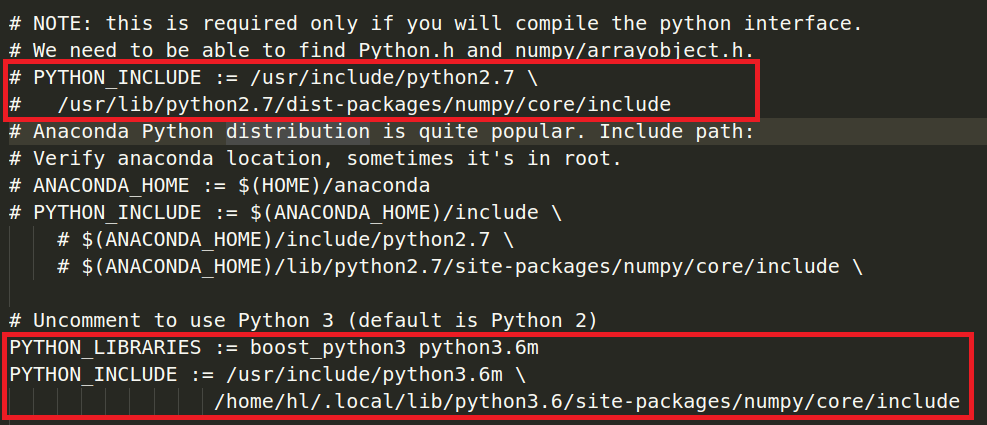
Python3版本需要在修改以上基础上,注释掉Python2的路径并输入正确的Python3的路径。
查看Numpy的安装目录:1
2python3 -c "import numpy; print(numpy.__file__)"
python3 -c "import numpy;print(numpy.__version__)"
查看Python的安装目录:1
2
3python -c "import sys; print(sys.executable)"
# 或
python -c "import os; path = os.sys.executable;folder=path[0 : path.rfind(os.sep)]; print(folder)"
输入以下命令进行编译:1
2
3sudo make all
sudo make pycaffe
sudo make test
运行Webcam Demo
下载对应的权重参数:http://mi.eng.cam.ac.uk/~agk34/resources/SegNet/
修改Scripts/webcam_demo.py的14行的caffe_root为你的SegNet目录。1
2
3
4
5
6
7
8
9
10
11
12# python
sys.path.append('/usr/local/lib/python2.7/site-packages')
# Make sure that caffe is on the python path:
caffe_root = './caffe-segnet-cudnn5/'
sys.path.insert(0, caffe_root + 'python')
import caffe
# Python3
sys.path.append('/home/hl/.local/lib/python3.6/site-packages')
# Make sure that caffe is on the python path:
caffe_root = './caffe-segnet-cudnn5-py3/'
sys.path.insert(0, caffe_root + 'python')
import caffe
调用以下命令:1
python Scripts/webcam_demo.py --model Example_Models/segnet_model_driving_webdemo.prototxt --weights Example_Models/segnet_weights_driving_webdemo.caffemodel --colours /Scripts/camvid12.png
绘制网络模型
在caffe/python/目录下有一个draw_net.py的python脚本文件,这是官方提供的一个模型可视化的脚本文件。1
2
3python ./python/draw_net.py 网络模型的prototxt文件 图片存放路径 --rankdir x
# x有LR RL TB BT四种选项,用于表示网络方向
python ./python/draw_net.py ../Models/segnet_train.prototxt ../Models/segnet.png
SegNet网络模型结构如下:
也可以用这个http://ethereon.github.io/netscope/#/editor在线工具展现网络模型结构。
绘图工具
在caffe/tools/extra/目录下官方提供了两个文件:plot_training_log.py.example和parse_log.py这两个脚本文件,使用第一文件可以将相关日志文件图形化显示出来。输入以下命令:1
python ./tools/extra/plot_training_log.py.example
会输出如下提示:1
2
3
4
5
6
7
8
9
10
11
12
13
14
15
16
17
18
19
20This script mainly serves as the basis of your customizations.
Customization is a must.
You can copy, paste, edit them in whatever way you want.
Be warned that the fields in the training log may change in the future.
You had better check the data files and change the mapping from field name to
field index in create_field_index before designing your own plots.
Usage:
./plot_training_log.py chart_type[0-7] /where/to/save.png /path/to/first.log ...
Notes:
1. Supporting multiple logs.
2. Log file name must end with the lower-cased ".log".
Supported chart types:
0: Test accuracy vs. Iters
1: Test accuracy vs. Seconds
2: Test loss vs. Iters
3: Test loss vs. Seconds
4: Train learning rate vs. Iters
5: Train learning rate vs. Seconds
6: Train loss vs. Iters
7: Train loss vs. Seconds
0-7表示曲线类别。文件要求的格式为.log日志文件。在训练时的命令后面加入2>&1 | tee examples/myfile/a.log便可生成相应的日志文件。1
./SegNet/caffe-segnet/build/tools/caffe train -gpu 0 -solver /SegNet/Models/segnet_solver.prototxt 2>&1|tee ./Log/segnet.log
>为重定向,&在后台运行,tee同时输出到控制台和文件
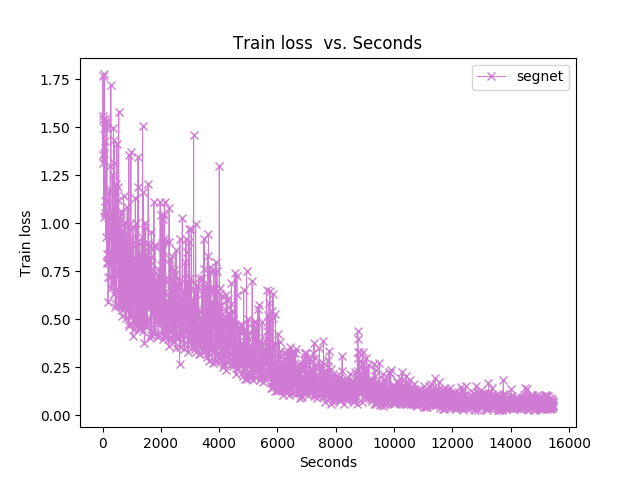
通过./plot_training_log.py.example 6 seconds.png segnet.log命令则会绘制相应的曲线。
parse_log.py文件的作用就是:将日志文件分解成*.log.train和*.log.test两个文件。1
python ./tools/extra/parse_log.py ./Log/segnet.log ./Log/
Models目录下会产生
遇到的问题
当前版本caffe的cudnn实现与所安装的cudnn的版本不一致。
1
2
3
4
5
6
7
8
9
10
11
12
13
14
15
16
17
18In file included from ./include/caffe/util/device_alternate.hpp:40:0,
from ./include/caffe/common.hpp:19,
from src/caffe/common.cpp:7:
./include/caffe/util/cudnn.hpp: In function ‘void caffe::cudnn::createPoolingDesc(cudnnPoolingStruct**, caffe::PoolingParameter_PoolMethod, cudnnPoolingMode_t*, int, int, int, int, int, int)’:
./include/caffe/util/cudnn.hpp:127:41: error: too few arguments to function ‘cudnnStatus_t cudnnSetPooling2dDescriptor(cudnnPoolingDescriptor_t, cudnnPoolingMode_t, cudnnNanPropagation_t, int, int, int, int, int, int)’
pad_h, pad_w, stride_h, stride_w));
^
./include/caffe/util/cudnn.hpp:15:28: note: in definition of macro ‘CUDNN_CHECK’
cudnnStatus_t status = condition; \
^
In file included from ./include/caffe/util/cudnn.hpp:5:0,
from ./include/caffe/util/device_alternate.hpp:40,
from ./include/caffe/common.hpp:19,
from src/caffe/common.cpp:7:
/usr/local/cuda-7.5//include/cudnn.h:803:27: note: declared here
cudnnStatus_t CUDNNWINAPI cudnnSetPooling2dDescriptor(
^
make: *** [.build_release/src/caffe/common.o] Error 1解决办法:
1)将./include/caffe/util/cudnn.hpp 换成最新版的caffe里的cudnn.hpp。
2)将./include/caffe/layers里所有以cudnn开头的文件如cudnn_conv_layer.hpp都替换成最新版的caffe里的相应的同名文件。
3)将./src/caffe/layer里所有以cudnn开头的文件如cudnn_lrn_layer.cu、cudnn_pooling_layer.cpp都替换成最新版的caffe里的相应的同名文件。fatal error: hdf5.h: No such file or directory
1)在Makefile.config文件中,添加/usr/include/hdf5/serial/ 到 INCLUDE_DIRS。1
2
3INCLUDE_DIRS := $(PYTHON_INCLUDE) /usr/local/include
INCLUDE_DIRS := $(PYTHON_INCLUDE) /usr/local/include /usr/include/hdf5/serial/
# 用第二行替换第一行nvcc fatal : Unsupported gpu architecture ‘compute_20’
在Makefile.config文件中将compute_20所在的行注释掉。找不到 lhdf_hl 和 lhdf5
1
2
3
4
5INCLUDE_DIRS := $(PYTHON_INCLUDE) /usr/local/include
LIBRARY_DIRS := $(PYTHON_LIB) /usr/local/lib /usr/lib
修改为:
INCLUDE_DIRS := $(PYTHON_INCLUDE) /usr/local/include /usr/include/hdf5/serial
LIBRARY_DIRS := $(PYTHON_LIB) /usr/local/lib /usr/lib /usr/lib/x86_64-linux-gnu /usr/lib/x86_64-linux-gnu/hdf5/serialImportError: cannot import name symbol_database
很多说是protobuf版本太高,通过pip安装2.5.0版本,但尝试之后任然存在。最后通过源码安装protobuf运行成功。
下载protobuf,进入python目录,执行以下命令:1
2
3python setup.py build
python setup.py test # 这一步我执行出错,但后面也能正确使用
python setup.py install
执行完后会在protobuf-all-3.6.1文件夹中出现google文件夹,用管理员方式将其复制到/usr/lib/python2.7/dist-packages.
- “dot” not found in path
1
2
sudo apt-get install graphviz
pip install pydot
记录几个常用的绘图命令1
2
3python draw_net.py ../examples/mnist/lenet_train_test.prototxt lenet5.png
python draw_net.py ../examples/LRCN_activity_recognition/train_test_lstm_flow.prototxt train_test_lstm_flow.png
python draw_net.py ../examples/LRCN_activity_recognition/train_test_lstm_flow.prototxt train_test_lstm_flow_TB.png --rankdir TB